
Notice
Recent Posts
Recent Comments
Link
| 일 | 월 | 화 | 수 | 목 | 금 | 토 |
|---|---|---|---|---|---|---|
| 1 | 2 | 3 | ||||
| 4 | 5 | 6 | 7 | 8 | 9 | 10 |
| 11 | 12 | 13 | 14 | 15 | 16 | 17 |
| 18 | 19 | 20 | 21 | 22 | 23 | 24 |
| 25 | 26 | 27 | 28 | 29 | 30 | 31 |
Tags
- rewrites
- next.js css
- github io
- createGlobalStyle
- API 토큰
- npm styled-reset
- fetch
- styled components
- Git
- CSS
- nextjs 설치
- nextjs .env
- API token
- git lab
- SCSS
- input type=file
- 컨디셔널 렌더링
- react typescript
- nextjs
- bootstrap
- ngrok실행
- react
- github
- dart 변수
- There isn’t anything to compare
- typescript react
- ngrok설치
- react env
- icon
- getModifierState
Archives
- Today
- Total
꾸준히 성장하는 개발자
BootStarp - npm 프로젝트 본문
Bootstrap
The most popular HTML, CSS, and JS library in the world.
getbootstrap.com
이렇게 link태그와 script태그를 통해서 bootStrap을 손쉽게 가져올수 있지만 약간의 기능제한이 있다.
	<link
      href="https://cdn.jsdelivr.net/npm/bootstrap@5.1.3/dist/css/bootstrap.min.css"
      rel="stylesheet"
      integrity="sha384-1BmE4kWBq78iYhFldvKuhfTAU6auU8tT94WrHftjDbrCEXSU1oBoqyl2QvZ6jIW3"
      crossorigin="anonymous"
    />
    <script
      src="https://cdn.jsdelivr.net/npm/bootstrap@5.1.3/dist/js/bootstrap.bundle.min.js"
      integrity="sha384-ka7Sk0Gln4gmtz2MlQnikT1wXgYsOg+OMhuP+IlRH9sENBO0LRn5q+8nbTov4+1p"
      crossorigin="anonymous"
    ></script>
그래서 npm 프로젝트로 관리를 진행한다.
1. 터미널을 열어 npm init -y 을 입력하여 package.json파일을 만들어 준다.
2. npm i -D parcel-bundler 입력하여 개발의존성으로 설치한다.
3. 설치가 다 되면 package.json파일을 열어
devDependencies부분에 "parcel-bundler": "^1.12.5"이 잘 설치가 되었는지 확인한다.

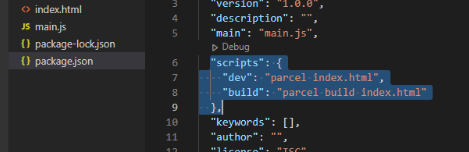
4. "scripts" 부분으로 가서
아래 "test"부분 지우고 아래와 같이 작성한다.
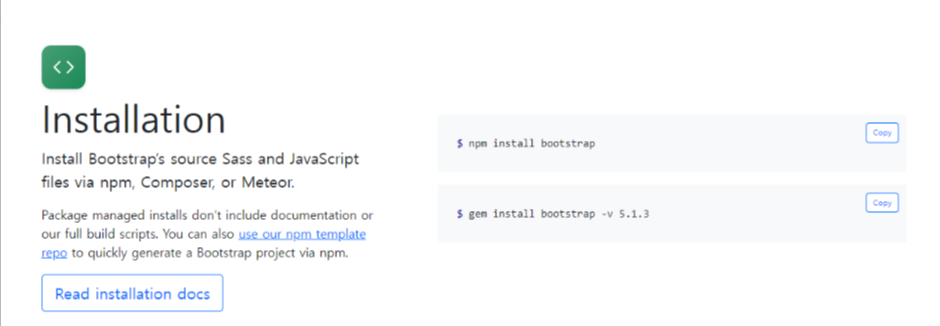
5. 터미널에 아래와 같이 입력하여 설치한다.
npm install bootstrap
6. package.json파일에서 아래에 설치가 잘되었는지 확인한다.
  "dependencies": {
    "bootstrap": "^5.1.3"
}'CSS > BootStrap' 카테고리의 다른 글
| [BootStrap] 테마 색상 커스트마이징 (0) | 2022.04.14 |
|---|---|
| BootStrap - 툴팁(tooltip) (0) | 2022.04.12 |
| BootStrap (0) | 2022.03.30 |
'CSS/BootStrap' Related Articles
more


